Python xlwt设置excel单元格字体及格式
本文根据自己初学经验编写的使用xlwt模块设置单元格的一些基本样式,如设置单元格的背景颜色,下框线,字体,字体的颜色,设置列宽行高,插入简单的图片,详细程序如下:
#!/usr/bin/env python
# -*- coding: utf-8 -*-” #只对当前文件的中文编码有效
#Create by zhizaiqianli 2015-12-12 Version V1.0
#!/usr/bin/python
# Filename : Write_excel_Format.py
import os
import time
from xlwt import *
from Mymodule import cur_file_dir
filename = 'TestData2.xls' #检测当前目录下是否有TestData2.xls文件,如果有则清除以前保存文件
if os.path.exists(filename):
os.remove(filename)
print time.strftime("%Y-%m-%d",time.localtime(time.time())) #打印读取到当前系统时间
wbk = Workbook(encoding='utf-8')
sheet = wbk.add_sheet('new sheet 1', cell_overwrite_ok=True) #第二参数用于确认同一个cell单元是否可以重设值。
style = XFStyle() #赋值style为XFStyle(),初始化样式
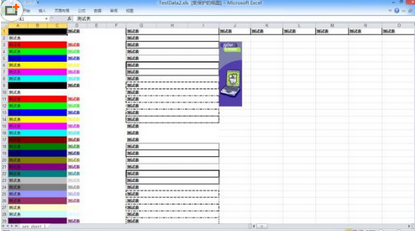
for i in range(0x00,0xff): # 设置单元格背景颜色
pattern = Pattern() # 创建一个模式
pattern.pattern = Pattern.SOLID_PATTERN # 设置其模式为实型
pattern.pattern_fore_colour = i
# 设置单元格背景颜色 0 = Black, 1 = White, 2 = Red, 3 = Green, 4 = Blue, 5 = Yellow, 6 = Magenta, the list goes on...
style.pattern = pattern # 将赋值好的模式参数导入Style
Line_data = (u'测试表') #创建一个Line_data列表,并将其值赋为测试表,以utf-8编码时中文前加u
sheet.write_merge(i, i, 0, 2, Line_data, style) #以合并单元格形式写入数据,即将数据写入以第1/2/3列合并德单元格内
for i in range(0x00,0xff): # 设置单元格内字体样式
fnt = Font() # 创建一个文本格式,包括字体、字号和颜色样式特性
fnt.name = u'微软雅黑' # 设置其字体为微软雅黑
fnt.colour_index = i # 设置其字体颜色
fnt.bold = True
style.font = fnt #将赋值好的模式参数导入Style
sheet.write_merge(i,i,3,5,Line_data,style) #以合并单元格形式写入数据,即将数据写入以第4/5/6列合并德单元格内
for i in range(0, 0x53): # 设置单元格下框线样式
borders = Borders()
borders.left = i
borders.right = i
borders.top = i
borders.bottom = i
style.borders = borders #将赋值好的模式参数导入Style
sheet.write_merge(i,i,6,8,Line_data,style) #以合并单元格形式写入数据,即将数据写入以第4/5/6列合并德单元格内
for i in range(6, 80): # 设置单元格下列宽样式
sheet.write(0,i,Line_data,style)
sheet.col(i).width = 0x0d00 + i*50
path_py = "\\images\python.bmp" #读取插入图片以.py运行时路径,images和.py在同一目录下
path_exe = "\\images\python.bmp" #读取插入图片以.exe运行时路径,.exe可以移到其他任意目录下运行但images和.exe在同一目录下
path = cur_file_dir(path_py,path_exe) #获取文件的相对路径
filename = path #检测当前目录下是否有python.bmp图片,
if os.path.exists(filename):
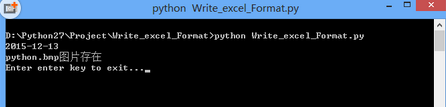
print u'python.bmp图片存在'
else:
print u'python.bmp图片不存在'
sheet.insert_bitmap(path, 2, 9) #插入一个图片
wbk.save('TestData2.xls') #保存TestData2.xls文件,保存到脚本或exe文件运行的目录下
raw_input("Enter enter key to exit...") #插入一个输入命令,方便运行exe时一闪而过不到打印信息
以cmd命令运行 Write_excel_Format.py时结果和生成表格如下所示
以上就是本文的全部内容,希望对大家的学习有所帮助

数据分析咨询请扫描二维码


